Change Password at Next Sign-in Bulk Upload
This browser is no longer supported.
Upgrade to Microsoft Edge to accept advantage of the latest features, security updates, and technical back up.
Majority create users in Azure Agile Directory
Azure Active Directory (Azure Advertizing) supports majority user create and delete operations and supports downloading lists of users. Just make full out comma-separated values (CSV) template you tin can download from the Azure AD portal.
Required permissions
In guild to bulk create users in the assistants portal, you lot must be signed in as a Global administrator or User ambassador.
Understand the CSV template
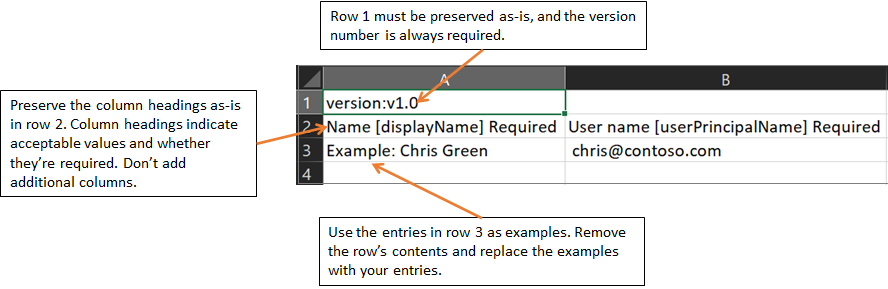
Download and make full in the bulk upload CSV template to help you successfully create Azure AD users in bulk. The CSV template you download might expect like this example:
Warning
If y'all are adding only one entry using the CSV template, you lot must preserve row three and add together your new entry to row iv.
Ensure that you add the ".csv" file extension and remove any leading spaces before userPrincipalName, passwordProfile, and accountEnabled.
CSV template structure
The rows in a downloaded CSV template are equally follows:
- Version number: The first row containing the version number must exist included in the upload CSV.
- Column headings: The format of the cavalcade headings is <Item name> [PropertyName] <Required or blank>. For example,
Name [displayName] Required. Some older versions of the template might take slight variations. - Examples row: Nosotros have included in the template a row of examples of acceptable values for each column. You must remove the examples row and replace it with your own entries.
Additional guidance
- The start two rows of the upload template must not be removed or modified, or the upload tin can't be processed.
- The required columns are listed first.
- We don't recommend adding new columns to the template. Whatever additional columns you add are ignored and not processed.
- We recommend that you download the latest version of the CSV template as oftentimes equally possible.
- Make sure to check there is no unintended whitespace before/after any field. For User main proper name, having such whitespace would crusade import failure.
- Ensure that values in Initial password comply with the currently active password policy.
To create users in bulk
-
Sign in to your Azure AD organization with an account that is a User administrator in the system.
-
In Azure Advert, select Users > Bulk create.
-
On the Bulk create user page, select Download to receive a valid comma-separated values (CSV) file of user backdrop, and then add add users you want to create.

-
Open the CSV file and add together a line for each user yous want to create. The only required values are Name, User primary name, Initial password and Cake sign in (Yeah/No). Then save the file.

-
On the Bulk create user page, under Upload your CSV file, scan to the file. When you select the file and click Submit, validation of the CSV file starts.
-
Later the file contents are validated, you lot'll see File uploaded successfully. If in that location are errors, you lot must fix them earlier you tin submit the job.
-
When your file passes validation, select Submit to get-go the Azure bulk operation that imports the new users.
-
When the import operation completes, you'll run into a notification of the bulk operation chore condition.
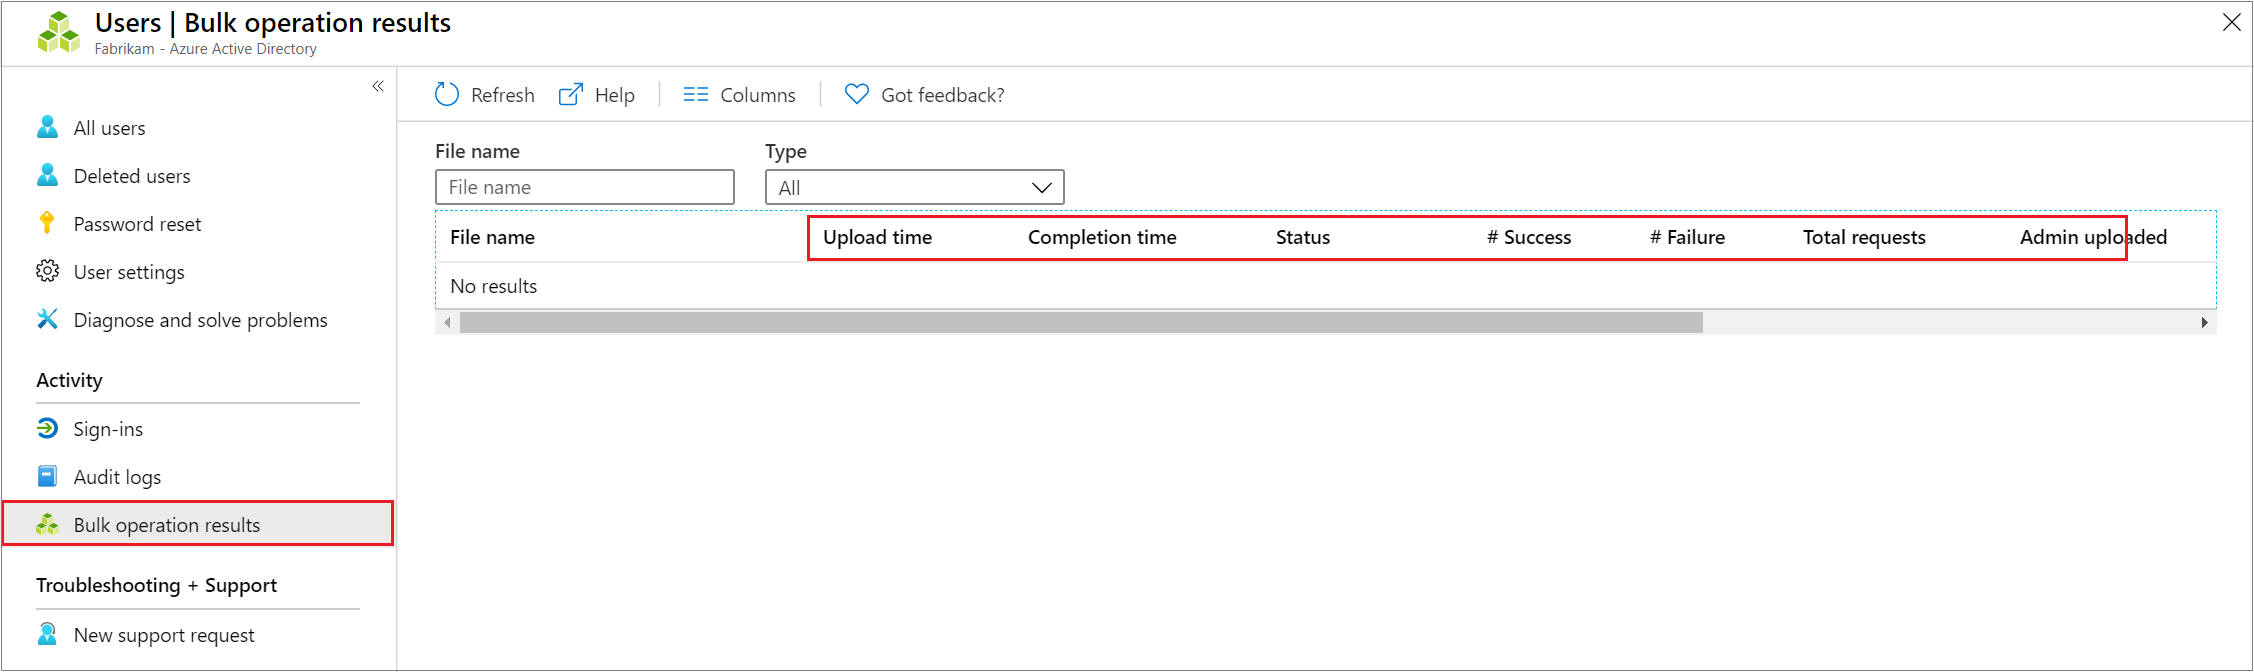
If at that place are errors, you tin can download and view the results file on the Bulk functioning results page. The file contains the reason for each error. The file submission must match the provided template and include the verbal column names.
Check status
You can see the condition of all of your pending bulk requests in the Bulk operation results page.
Next, y'all tin check to meet that the users y'all created exist in the Azure AD arrangement either in the Azure portal or by using PowerShell.
Verify users in the Azure portal
- Sign in to the Azure AD admin center with an account that is a User ambassador in the organization.
- In the navigation pane, select Azure Active Directory.
- Under Manage, select Users.
- Under Prove, select All users and verify that the users you created are listed.
Verify users with PowerShell
Run the following command:
Go-AzureADUser -Filter "UserType eq 'Member'" You should see that the users that yous created are listed.
Bulk import service limits
Each bulk activity to create users tin can run for upward to ane hour. This enables bulk creation of at least 50,000 users.
Next steps
- Bulk delete users
- Download listing of users
- Majority restore users
Feedback
Submit and view feedback for
Source: https://docs.microsoft.com/en-us/azure/active-directory/enterprise-users/users-bulk-add
0 Response to "Change Password at Next Sign-in Bulk Upload"
Post a Comment